How to Rig a Worm Under a Bobber for Bluegill
Fishing can feel like a secret club with all its specialized jargon, techniques, and equipment, especially if you're new to it or introducing youngsters to the joys of the outdoors. The idea of "rigging" can sound intimidating, but it doesn't have to be. Today, we're going to demystify one of the most effective, simple, and utterly classic ways to catch one of Arkansas's most beloved and abundant fish: the bluegill, using nothing more complicated than a worm and a bobber. This method is fantastic for beginners and seasoned pros alike, promising fun, bites, and memories without all the fuss.
The Timeless Appeal of Bobber and Worm Fishing for Bluegill
There's a reason why the image of a red and white bobber dancing on the water with a bent rod is practically iconic in fishing culture. It’s effective, it’s engaging, and it connects us directly to the simple pleasure of catching fish. When it comes to bluegill, this particular setup is a match made in heaven. Bluegill, those feisty little panfish with their distinctive dark spot on the gill flap, are often found in large schools, are typically quite aggressive feeders, and are an absolute blast to catch on light tackle. They don't require fancy lures or complex retrieval techniques, making them the perfect target for a basic bobber and worm rig.
The beauty of the bobber is its visual simplicity. Instead of needing to feel a subtle bite through your rod and line, which can be tricky for newcomers, the bobber acts as a clear indicator. When that bobber twitches, dips, or disappears completely, you know you've got action! This immediate visual feedback is incredibly rewarding, especially for kids whose attention spans might wander with more nuanced fishing methods. It turns fishing into an active game, full of anticipation and delightful surprises, rather than a test of tactile sensitivity.
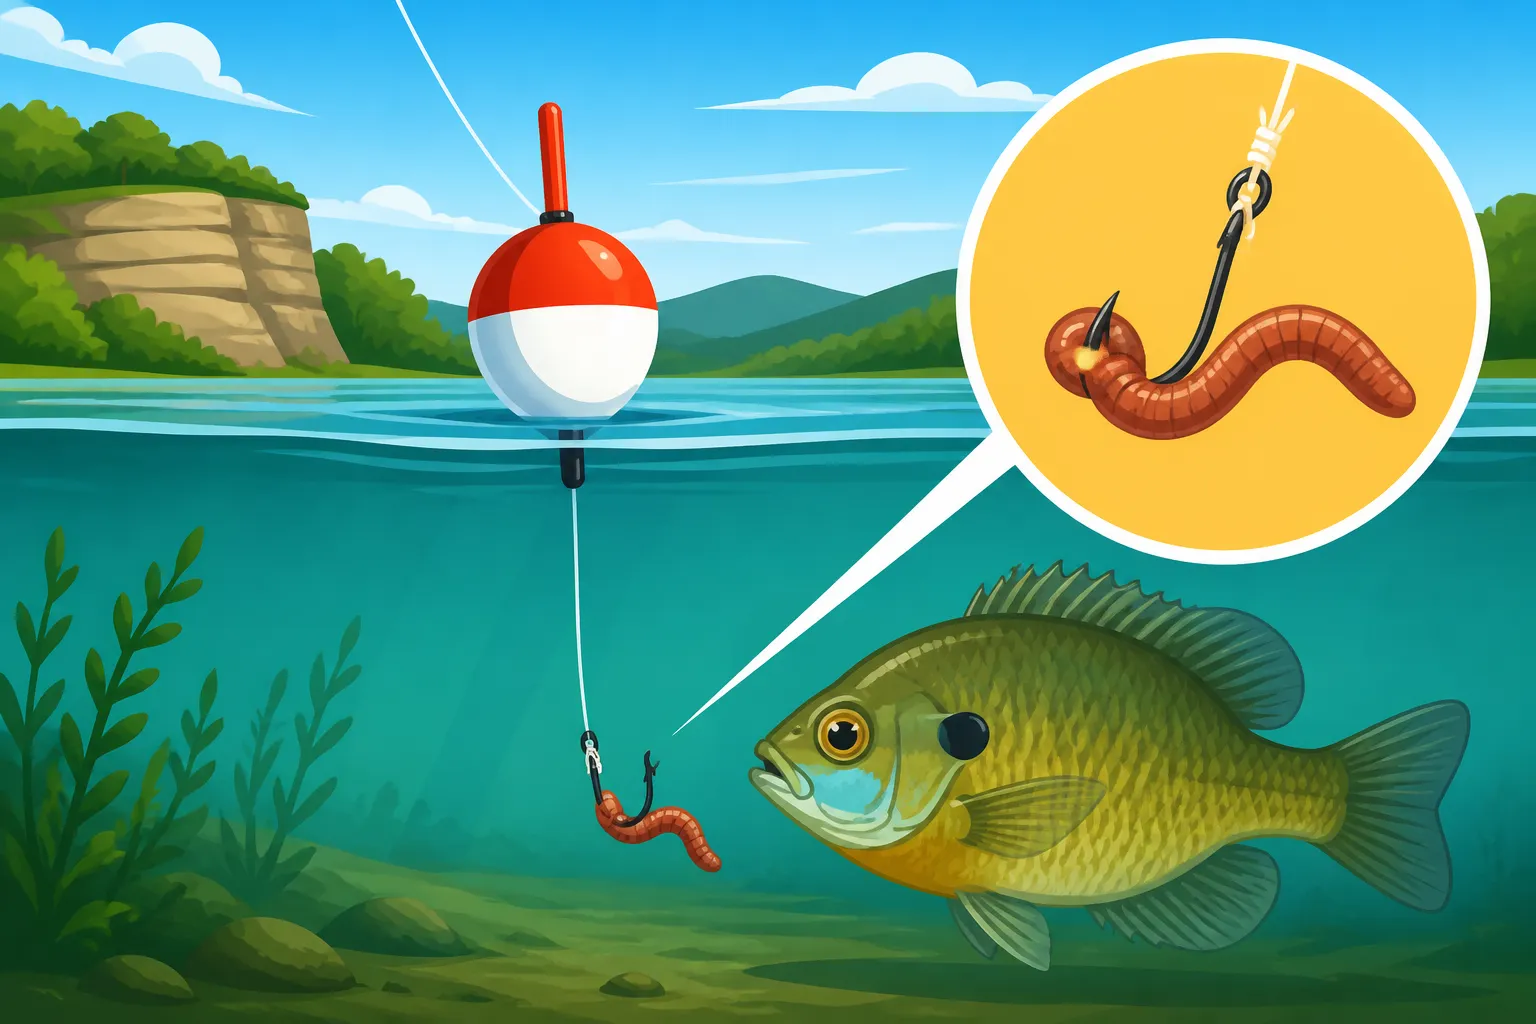
Moreover, bluegill are found almost everywhere in Arkansas, from small farm ponds and creeks to larger lakes and reservoirs. They thrive in various habitats, often congregating around submerged structures, weed beds, or shaded areas, always on the lookout for an easy meal. And what's easier than a juicy worm dangling right in front of their faces? The bobber suspends your bait at a consistent depth, allowing you to present it right in the bluegill's feeding zone, maximizing your chances of a bite without requiring constant adjustment. It's a low-stress, high-reward approach that truly embodies the spirit of recreational fishing.
Essential Gear for Your Bluegill Bobber Setup
Before you even think about tying knots, you need to gather your fishing arsenal. The good news is, you don't need a boatload of expensive, specialized equipment for bluegill fishing. In fact, one of the charms of this method is how accessible it is. Think simple, light, and effective. Having the right basic components will set you up for success and ensure your time on the water is enjoyable and productive. Many of these items can be easily found at your local tackle shop or through online retailers like Amazon.
Choosing the Right Rod and Reel Combo
For bluegill, a light action spinning rod and reel combo is your best friend. What does "light action" mean? It refers to how much the rod bends under pressure and how quickly it returns to its original position. A light action rod is more sensitive, allowing you to feel the smaller tugs of a bluegill, and it makes even small fish feel like champions. Look for a rod in the 5 to 6.5-foot range, with a fast or moderate-fast action tip. The reel should be a small spinning reel, typically in the 1000 or 2000 size range, spooled with light monofilament line.
Opting for a spinning reel is crucial for beginners because it’s much easier to cast than a baitcasting reel, which can lead to frustrating "bird's nests" of tangled line. A good quality, inexpensive spinning combo will be perfectly adequate and will last for many seasons of bluegill adventures. A 4 to 6-pound test monofilament line is ideal. It’s thin enough to be relatively inconspicuous to the fish but strong enough to handle bluegill and the occasional larger surprise catch, like a bass or crappie, that might decide to investigate your worm.
Selecting Your Bobber and Weights
Bobbers come in a couple of main styles: clip-on (or spring-loaded) and slip bobbers. For general bluegill fishing with beginners, the simple clip-on bobber is often the easiest. They're typically round or oval and attach directly to your line with a spring-loaded clip. They’re fantastic for fishing in shallower waters where you don't need to cast a long distance or adjust your depth frequently. They stay in a fixed position on your line, which helps keep your bait at a consistent depth.
For weights, you'll want a small assortment of split shots. These are tiny, round lead (or lead-free alternatives) weights that you pinch onto your line. Their purpose is to help cast your bait farther and to sink your worm to the desired depth. They also help your bobber sit properly in the water, giving it the right buoyancy so it's sensitive enough to show even the lightest bites. A good rule of thumb is to use just enough weight to get your bait down and make your bobber stand upright, without pulling it under the surface. This balance is key to detecting those subtle bluegill nibbles.
Hook and Bait Selection for Hungry Bluegill
When it comes to bluegill, think small but strong for your hooks. Sizes ranging from a size 8 to a size 12 Aberdeen hook are generally perfect. Aberdeen hooks are popular for panfish because they are lightweight and have a longer shank, which makes them easier to remove from a fish's mouth. The thin wire of an Aberdeen hook also means it's less likely to damage live bait, keeping your worm lively and enticing. The smaller the hook, the easier it is for a bluegill to get it into its mouth, leading to more hooked fish.
And the bait? Well, for bluegill, it’s hard to beat a good old-fashioned worm. Red wigglers, commonly found at bait shops or even in your garden, are fantastic due to their lively action and convenient size. Nightcrawlers work too, but you’ll often want to pinch off a piece so it’s not too big for the bluegill’s mouth. Bluegill aren't picky, so if it wiggles and looks edible, they'll likely go for it. The scent and movement of a live worm are almost irresistible to them. Remember, fresh bait is always best, so keep those worms cool and lively until you're ready to rig them.
Step-by-Step: Rigging Your Bluegill System
Now for the main event: putting it all together! Don't fret; this isn't rocket science. We're going to break down the rigging process into simple, manageable steps. Before you know it, you'll have a perfectly balanced bluegill setup ready to hit the water. This foundational skill will serve you well for many different types of fishing, and once you master it, you'll feel much more confident tackling other techniques down the line.
Attaching the Bobber and Setting Your Depth
First things first, let's get that bobber on. If you're using a clip-on bobber, simply press the button on the top (or pull the spring-loaded wire on the bottom) to expose the small hook, then hook it onto your fishing line. Do the same for the bottom clip, making sure it’s securely fastened. You want the bobber to be able to slide a bit if needed, but not freely.
Now, about setting the depth: this is where you decide how deep your worm will sink. For bluegill, they're often found in shallower water, especially near cover. Start by setting your bobber so your bait will be about 2 to 4 feet deep. If you're fishing near a dock or a fallen tree, try setting it so the worm is just above the bottom or suspended right in the middle of the water column. If you aren't getting bites, don't be afraid to adjust this. Slide the bobber up your line to go deeper, or slide it down to fish shallower. This flexibility allows you to "find" where the fish are holding, which is a key fishing strategy.
Adding the Necessary Weight (Split Shot)
After your bobber is in place, it’s time to add a split shot or two. This small weight serves a couple of purposes: it helps your line sink quickly and keeps your bait in the strike zone, and it also helps you cast further. Take one or two small split shot weights (often labeled as #7, #5, or BB sizes) and pinch them onto your fishing line, typically about 6 to 12 inches above where your hook will be. Use pliers or a split shot tool for this to get a firm crimp without damaging the line.
The goal here is to use just enough weight to properly load your rod for casting and to make your bobber sit upright in the water with most of its body submerged, but still visible. If your bobber is lying flat on the surface, you probably don't have enough weight. If it’s sinking completely, you’ve got too much. This subtle balance allows the bobber to be sensitive enough to show even the gentlest bluegill bites. You can experiment by adding or removing split shots until you achieve that perfect upright float.
Tying on Your Hook and Baiting Your Worm
Finally, the most critical step for connecting with a fish: tying on your hook. For beginners, two reliable knots are the Improved Clinch Knot or the Palomar Knot. Both are strong and relatively easy to learn. Pass your line through the eye of the hook, tie your chosen knot securely, and trim any excess line close to the knot. A sharp pair of clippers is handy for this, and you can even find some great, affordable options on Amazon.
Once your hook is tied, it's time for the bait! Take a small red wiggler or a piece of nightcrawler and thread it onto your hook. You want to cover the hook point, but don't feel like you need to completely impale the entire worm. A common technique is to hook the worm once or twice through its body, allowing the ends to dangle freely. This ensures the worm stays lively and wiggles enticingly, creating vibrations and releasing scent that will attract bluegill. A lively, natural presentation is far more appealing to a hungry bluegill than a motionless blob of bait.
Here’s a quick overview of typical rigging components for bluegill:
| Component | Recommendation | Purpose |
|---|---|---|
| Rod | 5-6.5 ft Light Action Spinning | Sensitive to bites, fun fight, easy casting |
| Reel | 1000-2000 Series Spinning | Easy to operate, smooth retrieve |
| Line | 4-6 lb Monofilament | Discreet, strong enough for bluegill |
| Bobber | Small to Medium Clip-on or Slip | Visual bite indicator, suspends bait |
| Weight | #7, #5, or BB Split Shot | Aids casting, sinks bait, balances bobber |
| Hook | Size 8-12 Aberdeen or Plain Shank | Small for bluegill mouths, easy removal |
| Bait | Red Worms, Nightcrawlers (pieces) | Irresistible natural scent and movement |
Mastering the Art: Tips for Bluegill Success
Rigging your bobber and worm is just the first step. To truly enjoy bluegill fishing and consistently bring in catches, you'll want to layer in a few more strategies. It’s all about understanding where bluegill live, how they feed, and how to respond when they bite. These tips will help transform your simple setup into a bluegill-catching machine, turning your fishing trips into memorable adventures, especially when you’re out with family members learning How to Teach a Kid to Fish for Bluegill.
Locating Bluegill Hotspots
Bluegill are creatures of comfort and safety. They love structure and shade, especially in warmer weather. When you arrive at your fishing spot, whether it's a pond or a large lake, look for areas with submerged timber, rock piles, docks, lily pads, or overhanging trees. These spots provide cover from predators and offer cooler water, making them prime real estate for bluegill. Shallow coves, especially those with some vegetation, can also be fantastic spots, as bluegill often spawn in these areas during the spring and early summer. If you're unsure where to start, ask locals or look for areas where other anglers are having success. Often, the Best Panfish Spots for Beginners on Local Lakes are right under your nose.
Another excellent strategy is to observe the water. Look for subtle ripples or disturbances that might indicate schooling fish. Bluegill often gather in large groups, so where you catch one, you're likely to catch more. Pay attention to how deep you're fishing. If you're not getting bites at 2 feet, try adjusting your bobber to 4 feet. Experiment with different depths until you find the bluegill's preferred feeding zone. Remember, these fish can be anywhere from just below the surface to several feet deep, depending on the time of day, water temperature, and available cover. For more specific insights into these fantastic panfish, you might want to learn How to Identify a Bluegill and understand more about their habitat.
Observing and Reacting to the Bobber's Dance
This is where the excitement really builds! Once your baited hook is cast, watch your bobber intently. Bluegill bites can range from subtle twitches to violent plunges. Sometimes, the bobber will simply lie flat on its side, which means a bluegill has picked up the bait and is swimming towards the surface with it. More often, you’ll see it dip, dance, and then decisively pull under the water. That's your cue!
When the bobber goes down, wait just a moment – a second or two – to ensure the fish has fully taken the bait. Then, quickly but smoothly, lift your rod tip upward and slightly backward to "set the hook." Don’t jerk too hard, as bluegill have tender mouths. A gentle but firm sweep of the rod is usually all it takes. Once you feel the fish on the line, reel it in steadily. The key here is patience, followed by a quick, decisive action. If you're fishing with kids, teaching them to watch the bobber and react to its movements is one of the most exciting parts of Kid-Friendly Fishing Techniques.
Responsible Angling and Local Regulations
While bluegill are abundant, it's always important to practice responsible angling. If you plan to release your catch, handle the fish gently with wet hands to protect its slime coat. Try to remove the hook quickly. If the hook is deeply swallowed, it might be better to cut the line as close to the hook as possible to avoid further injury to the fish. Of course, bluegill are also famously delicious, and many anglers love to keep a mess of them for dinner! If you're wondering Is Bluegill Good to Eat?, the answer is a resounding yes!
Before you head out, always remember to check the current Arkansas Fishing Regulations Guide. These regulations are in place to ensure healthy fish populations for everyone to enjoy. This includes understanding Arkansas Fishing License Rules and Costs – generally, anyone over a certain age needs a license, though exceptions apply, such as Do Kids Need a Fishing License in Arkansas?. Being aware of daily limits and any specific length restrictions for bluegill or other panfish in your chosen fishing spot is crucial. By following these guidelines, you're contributing to the conservation of Arkansas's amazing aquatic resources, ensuring that future generations can enjoy the simple pleasure of catching bluegill on a bobber and worm.
Disclaimer
This article is for general informational purposes only and does not constitute professional advice. Laws, prices and regulations vary by location and change over time. Consult a qualified professional for guidance on your specific situation.